World 1-3: How Does a Ventilator Work?

Hello, SuperCaptainBraveFAM!

I’m Nurse Leah and I’m here with another installment of the Science Saga of SuperCaptainBraveMan!

In World 1-1, we learned about the lungs and what they do. We even made our own “mini-lung” to show how the lungs inflate inside the chest.

In World 1-2, we found out that CPR (aka: cardiopulmonary respiration) can be done using only our hands to pump blood through the body and bring the oxygen we need to where it has to go. At least, until experienced medical help can arrive!

Now we enter World 1-3. And I’d like to share with you one of the mechanical ways medicine can help support our lungs and provide precious oxygen to our body.

Before we continue, just a quick recap of the parts of the respiratory system. (Remember that’s the name of the body system that’s responsible for breathing!)

The mouth & nose help air go into and out of your body.

The trachea (aka the Windpipe) is the tube that connects the mouth & nose to your lungs.

The muscles in between your ribs and a large muscle called the diaphragm work together to increase the space inside the chest and cause the lungs to expand.

The lungs are protected in your ribcage and hold smaller, balloon-like structures called alveoli. These alveoli are where carbon dioxide and other waste gases are exchanged for fresh oxygen.

Oxygen is needed to create energy in every single cell in your body!

All these parts work together for the main purpose of getting rid of waste gases and gaining new oxygen.

Recap done; I just need to explain one extra science fact about breathing.

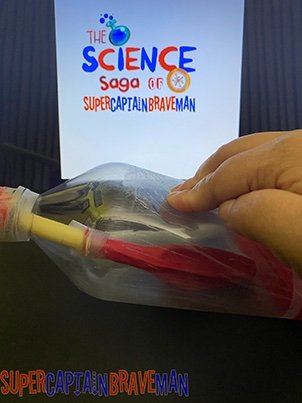
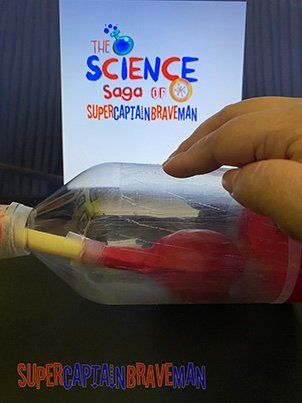
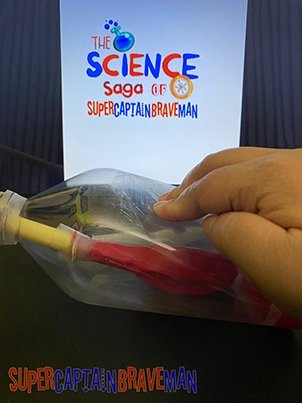
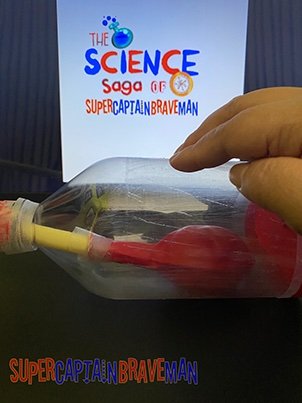
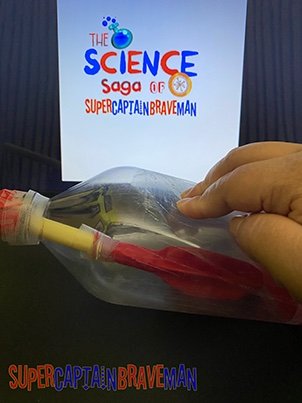
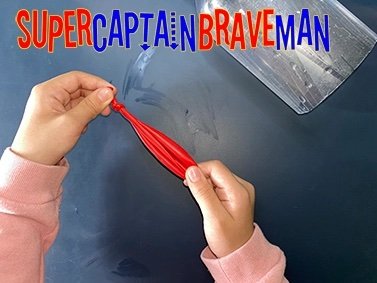
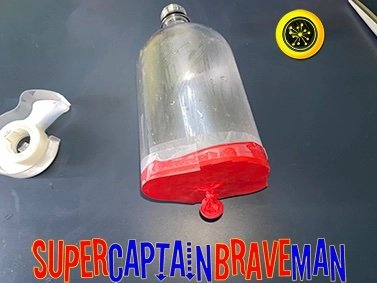
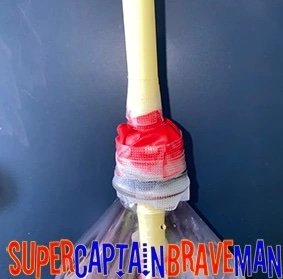
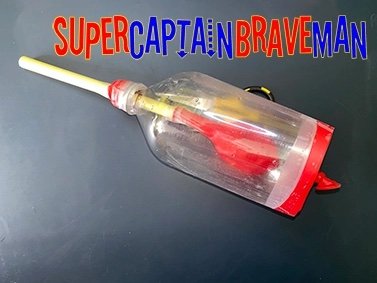
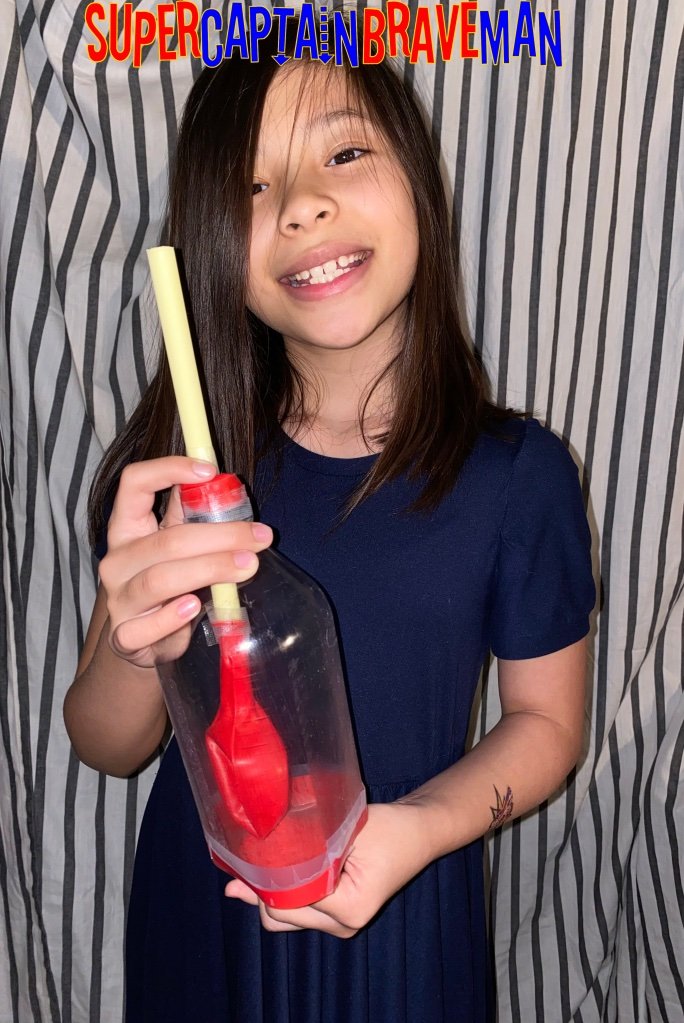
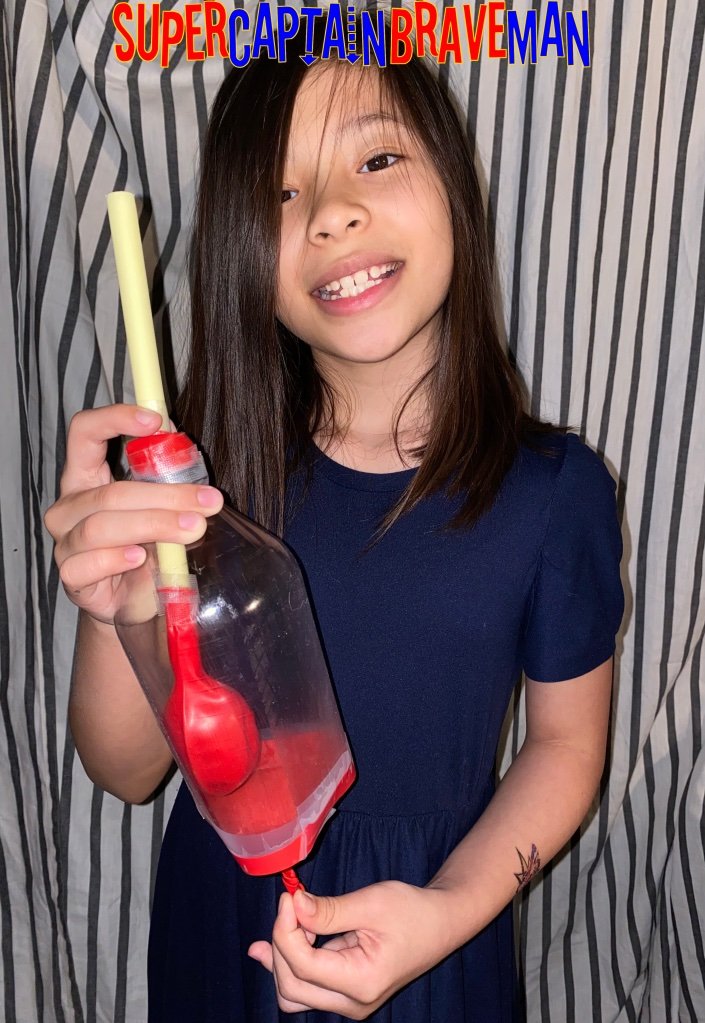
Look at our mini-lung!

If you still have the mini-lung from World 1-1, it’s a great visual example of what I’m talking about. When we made our mini-lung, we sealed off the bottom and top of the bottle. The balloon and straw inside the bottle now exist in a partial vacuum.

A vacuum is a space with nothing in it—not even air. A partial vacuum can have a little air or other stuff in it. The way scientists measure the strength of a vacuum is by using a measurement called pressure.

Because of the partial vacuum in the bottle, there are only 2 ways air can go in or out of the balloon.

  1. Changing the shape and size of the bottle by pulling the stretched “diaphragm” or compressing the bottle sides.

  2. Forcing air into the balloon by blowing directly through the straw.

The physical way our bodies take in air is option number 1; through a process called negative pressure breathing.

Since the space around the balloon is in a partial vacuum, this space will always want to have the same amount of pressure in it. By expanding the shape and size of the bottle, the pressure change inside will pull air in through the straw and inflate the balloon. The bigger the balloon gets, the closer to the original pressure the bottle becomes.

Air is pretty invisible so it may be hard to visualize how this works using just our mini-lung. If you have a medicine dropper, bulb syringe, or turkey baster, here’s a quick example of negative pressure in action.

Take your medicine dropper or turkey baster, squeeze the bulb a bit, put the tip in a cup of liquid, and let go of the bulb.

Where did the liquid go? Into the dropper!

That’s because items like medicine droppers, eye droppers, turkey basters, or those bulb syringes you use to suck up baby boogers all have partial vacuums!

Now, you might be thinking, “If negative pressure breathing exists, then positive pressure breathing is a thing too, right?”

You are absolutely correct!

Conventional CPR used by those trained in it, requires rescue breaths aka mouth-to-mouth. This is where air is blown into the lungs by an outside force.

The outside force can be the breath of a rescuer; air pushed through a large, self-inflating bag aka a bag valve mask; or in very serious and extended instances, a machine called a ventilator.

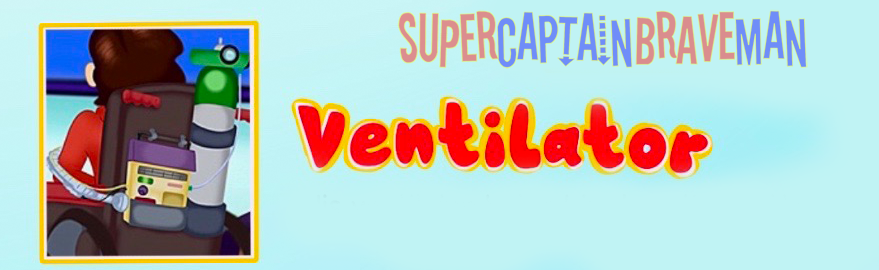
A ventilator is a form of life support. The machine takes over the work of breathing when a person isn’t able to breathe enough on their own. The ventilator pushes a mixture of air and oxygen into the lungs.

Very often, when someone has to use a ventilator, they also need extra oxygen. Using either oxygen tanks or an oxygen concentrator, tubes connect the source of the oxygen to the ventilator and into the person’s lungs.

Why would a person require extra oxygen if breathing normally already gives us all we need?

Imagine a handful of ice cream sprinkles—the rainbow kind. Some are white, some are pink, a few may be blue or light green. In a way, the air around us is a lot like that handful of sprinkles. Some of the air is oxygen, some is carbon dioxide, some is a gas called nitrogen or any other kind of gases. But altogether these separate gases make up the air we breathe.

Usually, breathing is enough. Our bodies sort through the different gases in the air and take the oxygen in as fast as it takes to take a breath. But, when a person isn’t able to breathe on their own, extra help is just that.

Extra help.

There are several reasons why a person would need a ventilator. One of the most common is because the help a ventilator gives allows the body to focus energy on other things like healing after an accident or during a severe infection.

Everything our bodies do require energy. Life support machines like ventilators help ease the strain on our bodies during the healing process.

In hospital settings like an ICU (intensive care unit), those using ventilators can have something called an endotracheal tube that connects the ventilator to them. This tube goes through the nose or mouth and into the Windpipe. And with the tube in place, they can’t talk or eat until it's removed.

Endotracheal tubes aren’t permanent and are removed when the person doesn’t need a ventilator anymore.

There are times when an endotracheal tube isn’t enough, though. If something is blocking the windpipe or the ventilator will be used for a long time, a tracheostomy procedure is performed.

Kyle has a tracheostomy tube put in place by his doctors.

Kyle has a tracheostomy tube put in place by his doctors.

A surgeon creates a hole in the person’s neck & trachea and inserts a tracheostomy tube into the hole. That tube is then connected to the ventilator and the person now has a working airway. While the tracheostomy tube is in place, the person can still talk and eat as long as they're very careful. 

Like the endotracheal tube, the tracheostomy tube—more commonly known as a trach—isn’t permanent and can be removed once the ventilator isn’t needed anymore.

Nurse Ashley checks Kyle's lungs before they begin the "sprinting" exercise.

When a person is getting better and the time comes to remove the ventilator, healthcare professionals will help them get used to breathing without it. Through a series of exercises and observational tests, healthcare workers assess a person’s ability to breathe on their own.

Nurse Ashley checks Kyle’s lungs before they begin the “sprinting” exercise.

For those with trachs, an exercise called “sprinting” is used. After disconnecting the ventilator tube, a small cap is placed over the trach. The person then focuses on breathing as normally as possible through their nose and mouth. After using a ventilator, the muscles used in respiration might need to retrain themselves for a bit.

Healthcare workers monitor the person closely and when the chosen sprinting time is reached, the ventilator is reconnected to the trach and the exercise is over. This is done again and for longer intervals until doctors believe that the person can breathe well on their own.

Breathing is an amazingly simple thing we do every day. Our bodies are designed so well that its something that happens naturally and mostly without conscious thought. So, when problems occur that mess with that function, scientists and doctors over the years have had to figure out new ways for people to breathe.

Science helped us discover how we breathe and is constantly searching to improve our knowledge in order to help others.

This adventure is far from over. Be sure to come back and explore new worlds with me in…

Until next week, stay safe and stay brave, SuperCaptainBraveFAM!

Join our mailing list and don’t forget to like & follow SuperCaptainBraveMan on social media for new posts and exciting news!

www.supercaptainbraveman.com

Instagram: @supercaptainbraveman

Facebook: www.facebook.com/supercaptainbraveman

World 1-2: What is CPR?

Hello, SuperCaptainBraveFAM!

Last week, we learned about the lungs and how we breathe. Today, we’ll learn about a way we can help someone in case they suddenly can’t breathe on their own. At least, until emergency medical personnel arrive.

Cardiopulmonary means relating to the heart and lungs.

Cardiopulmonary means relating to the heart and lungs.

This process is called Cardiopulmonary resuscitation or CPR.

Cardio means heart.

Pulmonary means lungs.

Resuscitation means to resume or revive.

Sometimes, a person can collapse very suddenly. Because of an accident or physical problem, their heart can stop beating and their breathing will pause as well. This can be very bad because the reason we breathe is to exchange carbon dioxide for fresh oxygen. And oxygen is essential to creating energy in our bodies.

In World 1-1, we learned that the lungs inflate and deflate when we breathe. This allows air to travel into our bodies from our nose and mouth. Muscles move to expand the space in our chest and exchange carbon dioxide for oxygen.

The heart is responsible for pumping blood throughout the body and is very important!

Resting in our chest along with the lungs is the heart. The heart needs to be close to the lungs because it’s the muscle that needs fresh oxygen the most. It pumps and pushes blood to the rest of the body and has the most important job ever.

The heart is responsible for pumping blood throughout the body and is very important!

Thanks to the heart pumping oxygen rich blood in our bodies, we can do things like dance, walk, work, play with our family, and sleep soundly.

So, when there are problems with our hearts, there are very serious problems with our bodies.

Modern CPR as we know it was introduced to the world in 1960 by Dr. William Kouwenhoven, Dr. James Jude, and Dr. Peter Safar. Thanks to the work of this team, they made it possible for everyday people to help those that collapse and need help.

“…anyone, anywhere can initiate cardiac resuscitation procedures. All that is needed are two hands.”

– Dr. William Kouwenhoven

According to the American Heart Association, there are two types of CPR.

Some people trained in CPR carry special one time use mouth guards to make mouth-to-mouth resuscitation safer.

The first is known as conventional CPR.

Some people trained in CPR carry special one time use mouth guards to make mouth-to-mouth resuscitation safer.

It’s the kind of CPR usually shown in TV shows and movies. Chest compressions are done along with mouth-to-mouth rescue breaths. It’s a multi-step process and one that you can get certified in after taking a CPR class.

This type of CPR is performed by healthcare professionals and others certified in CPR. It’s used to help people of all ages in an emergency situation.

The second type is called compression-only CPR or Hands-Only CPR.  

This kind of CPR doesn’t require any mouth-to-mouth. Since there is no mouth-to-mouth, Hands-Only CPR is a great way to help in an emergency if direct contact with the other person’s mouth isn’t advisable.

This type of CPR can be performed by anyone and is recommended only for adults & teenagers who suddenly collapse in out-of-hospital situations.

Unlike conventional CPR, Hands-Only CPR is made up of 2 steps.

  • Step 1: Activate the emergency response system.

    • Call 9-1-1 or have someone nearby do that.

  • Step 2: Push hard and fast in the center of their chest.

    • The best way to keep track is to push to the beat of a fast song like:

      • “Stayin’ Alive” by the Bee Gees

      • “Sweet Home Alabama” by Lynyrd Skynyrd

      • “MMMBop” by Hanson

      • “Just Dance” by Lady Gaga

      • “Hips Don’t Lie” by Shakira

If you still have the model lung we made in World 1-1, you can see how Hands-Only CPR works to inflate our lungs. The movement of chest compressions also helps mimic the way the heart beats and keeps the blood moving in our bodies.

Hands-Only CPR Example Using the Model Lung Experiment

According to the American Heart Association, immediate CPR can double or triple the chances of survival after cardiac arrest. (Cardiac arrest is when the heart malfunctions or stops working correctly.)

In fact, another study showed that sixth graders are able to perform Hands-Only CPR correctly once shown how to do it. CPR training is a high school graduation requirement in 34 states so far. In our home state of California, it’s been a requirement since 2018!

There are several different jobs that require CPR certification besides healthcare providers. Firefighters, police officers, child care providers, and flight attendants all need to learn CPR in the event someone collapses.

But Hands-Only CPR doesn’t need certification!

There are even kiosks that give a quick lesson on Hands-Only CPR located in different airports across the US. The lesson includes a video introduction and tutorial. As well as an interactive practice session on the manikin attached to the kiosk. A list of airports with these kiosks can be found here.

Watch below for a quick video on how Hands-Only CPR works. So easy, even Ken Jeong can do it!

Don't be afraid to use Hands-Only CPR, you could save a life!

Getting CPR training is a useful skill for everyone to have. In person classes might not be available right now, but once they are, we fully encourage everyone to get CPR certified.

After learning how the lungs work and how important oxygen is for us, knowing how to give aid in an emergency is a great way to help save a life.

So, remember to stay safe and stay brave, SuperCaptainBraveFAM!

The journey continues next week on…

Join our mailing list and don’t forget to like & follow SuperCaptainBraveMan on social media to hear all about it!

www.supercaptainbraveman.com

Instagram: @supercaptainbraveman

Facebook: www.facebook.com/supercaptainbraveman

World 1-1: How We Breathe

Hello, SuperCaptainBraveFAM!

I’m Nurse Leah and I’d like to talk about breathing. Why do we do it? Why do we need it? How does it all work?

The answer to the first two questions is simple: we breathe in to get fresh oxygen into our bodies and we breathe out to get rid of carbon dioxide and other waste gases.

Oxygen is an essential part of the process our body’s cells use to create energy in the most efficient way. A byproduct (or result) of that is carbon dioxide (CO2)—which is dangerous to keep in our bodies and that’s why we need to breathe it out. The process of using oxygen to make energy in our cells is called aerobic respiration.

There’s a way for our cells to get energy without oxygen, but it actually takes more effort and the byproducts of that process can be more harmful to your muscles. That process is called anaerobic respiration.

So, oxygen is really, really important for our bodies to work at its absolute best.

And the place where our body exchanges carbon dioxide for fresh oxygen is right there in our lungs!

That brings us to the third question I started with: How does it all work?

The parts of the body responsible for breathing are collectively called the Respiratory system. That’s because it’s a system of organs and parts of your body that work together to get some of the materials needed for aerobic respiration.

David, from A Kyle Adventure Book 2: Signs of the Season

So, let me introduce you to the parts of the Respiratory system, starting at your head with the nose and mouth.

When we breathe, air usually comes in through our nose or mouth. The truth is that the passages that make up the inside of your nose and mouth are connected. That’s why liquid comes out of your nose if you laugh too hard while drinking.

Have you ever gone out when it was especially cold and every time you breathed, it hurt your chest a little? Or has it ever been so hot and dry that you can practically taste the heat?

It’s because the difference in air temperature from your own body temperature contrasted a bit too much. Your body likes everything inside to stay pretty much the same temperature and works hard to maintain that. The inside of your body also likes to stay moist and doesn’t like to dry out too much—think of the inside of your mouth—and so one job of the mouth and nose is to warm and moisten the air entering your body.

Another job is that they keep particles that don’t belong in the body out. Things like dust and pollen get stuck in our nose hairs and sneezed out. Or the back of your mouth catches the bigger particles and you can cough them out.

Just a quick reminder to please cover your nose & mouth when coughing & sneezing, use tissues to wipe your face, and wash your hands afterward. Doing these things can help keep yourself clean and prevent the spread of diseases that take advantage of how our Respiratory systems work.

After our nose and mouth, the next part of the Respiratory system is the trachea.

The trachea is tube that runs alongside and in front of your esophagus. The esophagus is a soft, flexible tube that food travels down to get to the stomach. The trachea is more rigid and keeps its shape a lot more easily to allow airflow to travel properly.

The easy travel of airflow is why another name for the trachea is “The Windpipe.”

The trachea, bronchi, bronchioles, and the lungs.

The trachea, bronchi, bronchioles, and the lungs.

As it goes down into your chest, the trachea branches off into two bronchi—which are smaller tubes—and from there bronchioles—which are the smallest airway tubes of all.

At the end of the bronchioles are small clusters that look like tiny, tiny balloons. These clusters are called alveoli and this is where the exchange of oxygen and carbon dioxide take place.

The alveoli are covered with the smallest blood vessels in the body and the red blood cells in the vessels are the ones that trade the carbon dioxide they hold for new oxygen. They then take that oxygen to the rest of the body.

But more than the lungs—and all they hold—are needed to take a breath.

This is where muscles like your diaphragm and those in your rib cage come in to play.

The diaphragm is a muscle that sits right below the lungs and is the major muscle used in breathing. This boss muscle is dome shaped and when it contracts, it flattens. This makes the space inside your chest bigger and causes the lungs to inflate and expand.

The muscles in your rib cage—right in between your rib bones—also help expand your chest whenever you inhale.

When the space inside your chest gets bigger, air is sucked into your lungs and the alveoli fill with fresh oxygen. That is what happens when you inhale.

When the diaphragm and rib cage relax, the space inside your chest returns to it’s resting size. The air you just breathed in is released through your nose and mouth. That is what happens in your body when you exhale.

Breathing helps everyone race around and have fun!

And the exchange of oxygen and carbon dioxide happens in millions of tiny alveoli during that short time between inhaling and exhaling.

Our bodies automatically know how to take a breath. People like singers, dancers, actors, and athletes all learn how to control their breathing and use their respiratory muscles to improve their performances. It’s really amazing how our bodies take so many separate parts and use them together to do something like breathing!

If you want to get a simplified visual of how your body breathes, then here’s an experiment that adults and kids can do to make your own “mini lung”!

Make your own model lung at home!

Disclaimer: This experiment is relatively well-known and available online through multiple sources. Always be sure to be careful and have an adult handle the scissors. Safety is always important!

How to Make a Model Lung

Materials Needed

  • A plastic bottle

  • A straw (we used a wide, reusable boba straw)

  • 2 balloons (regular party balloons)

  • An elastic band or tape

  • Play dough or something to seal the bottle top (we used half of a balloon and tape)

  • A marker

  • Scissors

Instructions

  1. Mark the bottle halfway down and have an adult use the scissors to carefully cut the bottle at the mark. You can use the bottom half as a planter or decorate it to hold pencils. We’ll be using the top half for the experiment.

  2. Get one balloon and tie a knot at the opening. Use the scissors to cut the top off of the balloon.

  3. Take the top half of the bottle and stretch the tied-off balloon around the bottom of the bottle. Tape in place, if needed.

  4. Put the straw in the other balloon and secure in place with an elastic band or tape. Be careful not to crush the straw! Air needs to travel through it. You can blow gently through the straw to check if the balloon inflates to be sure.

  5. Put the straw and balloon into the neck of the bottle so that the balloon is inside the bottle near the center.

  6. Now, you have to make an airtight seal at the top of the bottle. There are two ways I know how to do this depending on what materials you have:

    1. You can use play dough to secure the straw at the top of the bottle where the cap usually goes. Make sure the straw isn’t crushed and that no air can escape through the play dough.

    2. Take the other balloon piece and have an adult cut a small hole in the center. Slide the top of the straw through the hole and bring the balloon piece down to the bottle opening. Secure the straw to the balloon with tape. Tape the balloon edges to the bottle, or you can use an elastic band to seal the balloon at the bottle opening.

Presto! You’ve made your own mini-lung!

You’ve probably figured out how the different materials make up the different parts of the respiratory system, right?

  • The bottle = your chest and rib cage

  • The straw = your windpipe

  • The balloon inside the bottle = your lungs

  • The balloon at the bottom of the bottle = your diaphragm

But how do you see it in action?

If your lungs inflate because your diaphragm makes the space inside your chest bigger…

What happens when you pull down on the balloon at the bottom?

Don’t be discouraged if it doesn’t work the first time. Just re-check for any holes or leaks in the tape or play dough to make sure everything is sealed and there are no leaks.

In fact, problems like small holes or leaks in our respiratory system can keep our own lungs from inflating properly. And it’s things like that that doctors and healthcare professionals look out for when treating patients who are having trouble breathing.

Knowing how our bodies work is important for us to know how to take care of ourselves. And especially important so we know how best to help those who might need it.

The human body is intriguing and amazing to learn about. There’s always more to learn and share.

Join us next week for another installment of…

The Science Saga of SuperCaptainBraveMan!

Until then, stay safe and stay brave!

Join our mailing list and don’t forget to like & follow SuperCaptainBraveMan on social media to hear all about it!

www.supercaptainbraveman.com

Instagram: @supercaptainbraveman

Facebook: www.facebook.com/supercaptainbraveman